Glue Gun Stand


 Introduction -
A Glue gun is an electric tool which uses a heating element to melt and dispense thermoplastic adhesive, also known as hot glue. The glue gun consists a handle, trigger and a nozzle (made of metal) that heats up when electric current is applied to the glue gun and melt the glue stick. When glue gets melted, it is dispensed through the nozzle on the material to be glued. Glue gun is used mostly in crafts, DIY projects and other applications where a strong and fast drying glue is required. It come in variety of sizes, shapes, styles and with cord or cordless, with different temperature regulators, to accommodate different types of glue sticks (thermoplastic adhesives).As you all know that dealing with glue gun is very messy. Melted glue may burn skin of fabric it contacts with. So here comes the invention of glue gun which makes Glue gun more efficient than ever before. Making your own Glue gun stand is very fun and easy DIY project. Here is the list of material you will need to make a Glue gun stand.
Requirements -
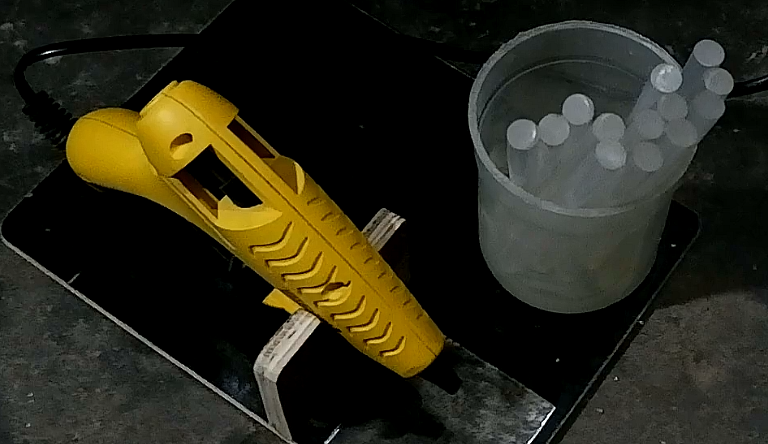
Plywood L*W*T (10"*8"*8 mm)=1
Sheet Metal (Iron) L*W*T (3"*3"*1 mm)=1
Glue Gun - https://amzn.to/451iO6t
Glue Sticks (a lot of) - https://amzn.to/3QjsJQJ
Tape dispenser (Optional) - https://amzn.to/46OqXNr
Fevicol - https://amzn.to/48ZhxQA
Fevi Kwik Super glue (Fast Glue) - https://amzn.to/3SjGS1M
Araldite (Epoxy Glue) - https://amzn.to/40ek99g
Table Saw / Circular Saw - https://amzn.to/3LyZlmO
Angle grinder 4" with metal cutting blade - https://amzn.to/3RruMmR
Drill Machine, Drill bits - https://amzn.to/4635rE3
Nails - https://amzn.to/3QA7El7
Hammer - https://amzn.to/3ZNUyDL
Hack saw - https://amzn.to/45lu6Tk
Measuring Tape, Scale, Ruler - https://amzn.to/3tMy3U2
Pencil, Marker - https://amzn.to/495dWAq
Let's Make it -
First we will need a wooden base for our Glue gun and glue stick to put so we will need to make a wood base. We will measure, mark and cut a plywood of L*W*T (10"*8"*8 mm) dimension using Table saw, If you don't have one use can use Circular saw or Hand saw. We will also required a Sheet metal of dimension L*W*T (3"*3"*1 mm). Sheet metal is required for hot glue to capture to it can not damage the wood. Decide where you want to stand your glue gun and place sheet metal and glue it to the base using epoxy glue or super glue.

Now we need to cut a wood (with the help or Hack saw) in such a shape which can hold our Glue gun work like a stand for glue gun.

Place this wood piece in front of sheet metal so that glue gun nozzle hover over sheet metal. Screw this wood piece from behind the the base and countersink the screw the Glue gun stand cat place smoothly on any surface.

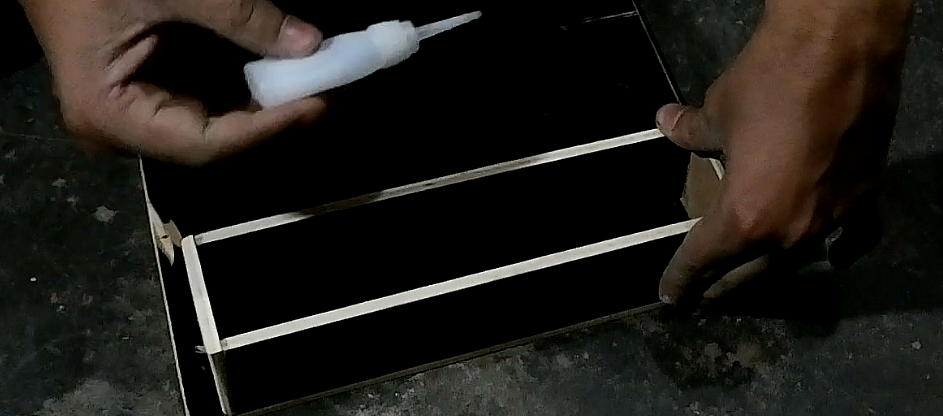
Now we need a plastic glass / Cup or something like that to hold Glue stick in it. We need to stick it to the base of the project using epoxy glue.
Our glue gun stand is almost ready, but if there any space left on the base we add any other stuff which we will need while using a glue gun. In my case I also use a cello tape while I use glue gun when I craft or DIY something. So.....

Our Glue gun stand is ready. Let move to making a Heat Gun stand.
Heat Gun (Hot air gun) Stand


Introduction -
A Heat gun / Hot air gun is a electric tool that produces a steam of hot air used to heat, dry and sometimes melt materials. It consists a handle (of course to hold in hand), a motor and a nozzle (made of metal) which is used to direct the hot air on the surface we are working on. Heat guns are often used in stripping paint, bending or melting plastic, shrink wrapping, welding plastic, molding and forming, thawing frozen pipes and softening glues, adhesive, sealant. Heat guns also comes with adjustable temperature setting.As you all know that dealing with heat gun is very dangerous. Hot nozzle of heat gun may burn skin of fabric it contacts with. So here comes the invention of heat gun which makes heat gun more efficient than ever before. Making your own heat gun stand is very fun and easy DIY project. Here is the list of material you will need to make a Heat gun stand.
Requirements -
Plywood L*W*T (10"*8"*8 mm)=1 , (8"*2"*8 mm)=2, (2"*2"*8 mm)=2
Heat Gun - https://amzn.to/3PQEKwO
Fevicol - https://amzn.to/48ZhxQA
Fevistic, super glue (Fast Glue) - https://amzn.to/3SjGS1M
Araldite (Epoxy Glue) - https://amzn.to/40ek99g
Table Saw / Circular Saw - https://amzn.to/3LzPCwp
Angle grinder 4" with metal cutting blade - https://amzn.to/45bcCsU
Drill Machine, Drill bits - https://amzn.to/3RxhhBX
Hole saw for wood - https://amzn.to/3PUF508
Nails - https://amzn.to/3QA7El7
Hammer - https://amzn.to/3ZNUyDL
Hack saw - https://amzn.to/45lu6Tk
Measuring Tape, Scale, Ruler - https://amzn.to/46AjtO5
Pencil, Marker - https://amzn.to/495dWAq
Let's Make it -
First we will need a wooden base for our Hlue gun and Shrink tubes to put so we will need to make a wood base. We will measure, mark and cut a plywood of L*W*T (10"*8"*8 mm) , 2 plywood (8"*2"*8 mm) and 2 plywood (2"*2"*8 mm) dimension using Table saw, If you don't have one use can use Circular saw or Hand saw. (10"*8"*8 mm) this sized plywood would be base for our Heat gun project.
2 plywood (8"*2"*8 mm) and 2 plywood (2"*2"*8 mm) would be used to make a rectangular boundaries for shrink tube box over the surface of heat gun stand.
Now carefully measure the diameter of the heat gun's neck (behind nozzle). And cut the a plywood of 10 mm thickness and make a hole of the same diameter which we measure of heat gun's neck using hole saw bit for wood.


Put heat shrink tubs box in the rectangular boundaries we made earlier. Now our Heat gun stand is ready. Heat gun and shrink tubes are placed in the same place so there is no chance of losing something, also we can use heat gun by holding on the surface and also can be used in hand.


Exilent glue gun
ReplyDeleteVery useful article.
ReplyDelete💯💯💯
ReplyDelete